Load testing for a Node.js app with K6
November 16, 2020 ☼ nodejs ☼ js ☼ tests
No matter how well you build your application, at some point it will fail. You don’t know when, how or why but it will.
How does your application fare in a real world scenario when your users start hitting your server with requests?
Our app should be prepared for it. We need to be able to simulate and test system’s behaviors under both normal and at peak conditions.
Enter load testing.
In this article I will show you how to set up your first load test with the help of K6.
k6 is a developer-centric, free and open-source load testing tool built for making performance testing a productive and enjoyable experience.
There are many other tools out there such as JMeter, BlazeMeter, Locust, Gatling, Taurus etc, but I find K6 intuitive and pretty reliable.
A quick recap: what is Load testing?
- Load Testing is the process of putting demand on a system and measuring its response time, throughput, CPU utilization, latency, etc.
- Helps to spot the maximum operating capacity of an application as well as any bottleneck and find out if your website or web app meets your goals.
- If we make the tests repeatable, we can identify any performance regression after new deployment and code change.
What to test?
Your application might be composed by several components: frontend, backend, data stores, third-party services etc.
Should I just test my API and its response time/error rates or should I simulate a browser and hit my Frontend with tons of requests?
Based on Steve Souders and his Performance Golden Rule 80-90% of the end-user response time is spent on the frontend. Start there..
You might think that is the answer but, as always in development, it depends.
I suggest you to read this part of the docs from K6 where it goes a bit deeper into this topic and give a clear prospective on what you should be start testing and some approaches.
In our specific case will take a mixed approach.
Testing Scenario
The following scenario is taken from a real world application. I had to simplify a lot of parts to make it easier to understand it. The tech stack and architecture is quite common though.
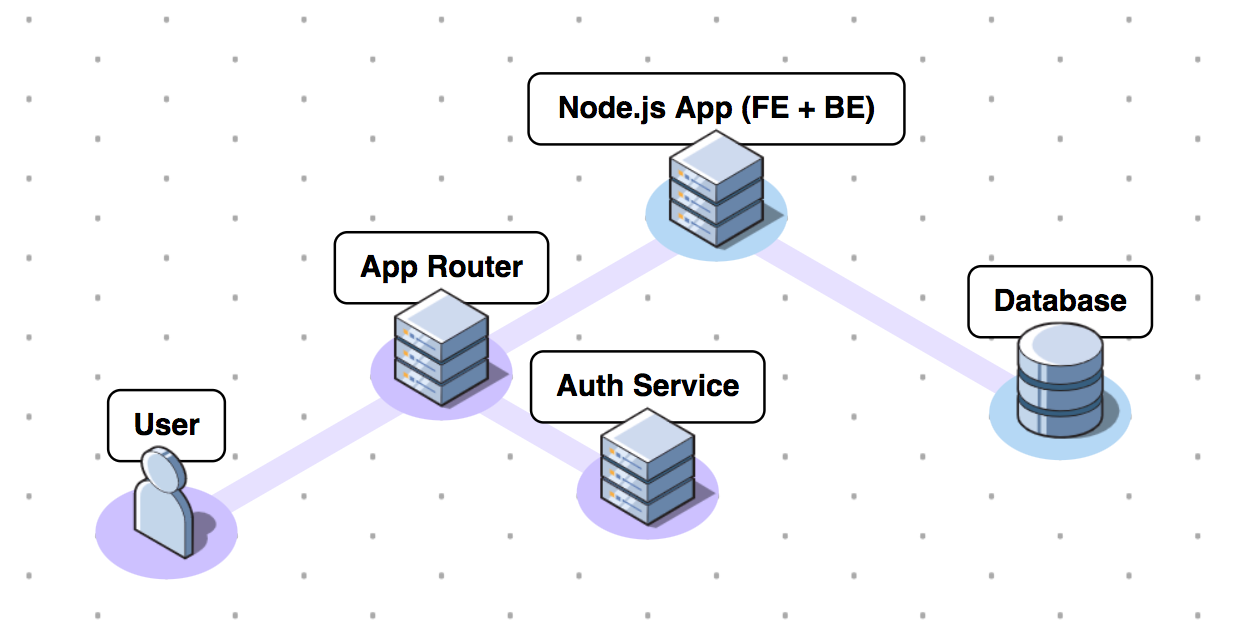
Tech Stack
- Backend: Node.js (Express)
- Database: PostgreSQL
- Frontend: SPA written in Vue.js
Preparation
The Backend (monolith) is in charge of serving API requests and static files for the Frontend. We’re going to simulate a browser transaction by including in the load test the relevant requests for static resources (css, js, fonts).
Another thing that you will have to deal with is making authenticated requests to your APIs. In this particular case, for brevity reason, will inline the auth cookies and add them to every requests (you can get them by logging in and inspecting the headers in the dev console). How are you generating and getting those values for your load tests will be very dependent on your system.
Steps and code!
1) Let’s define a basic configuration for the first test:
We’re bound to the free tier limitation of K6 in terms of number of Virtual Users
const usersToken = JSON.parse(open("./users.json")); // Separate file with our users credentials
const URL = "https://myapp.com";
const TEST_NAME = "First Test - simple user flow";

export let options = {
  stages: [
    { duration: "1m", target: 50 }, // simulate ramp-up of traffic from 1 to 50 users over 1 minute.
    { duration: "3m", target: 50 }, // stay at 50 users for 3 minutes
    { duration: "1m", target: 0 }, // ramp-down to 0 users
  ],
  thresholds: {
    error_rate: ["rate < 0.9"],
    http_req_duration: ["p(95)<2000"],
    "time_to_first_byte{type:static-assets}": ["p(95)<500"],
  },
  ext: {
    loadimpact: {
      projectID: 1234567, // You'll get this if you use K6 cloud
      name: TEST_NAME,
      distribution: {
        "amazon:us:ashburn": { loadZone: "amazon:us:ashburn", percent: 100 } // The free tier will not allow to use multiple locations
      }
    }
  }
};

const timeToFirstByte = new Trend("time_to_first_byte", true);
What we are telling to K6 here is that the response time for 99% of the requests must be below 2 seconds and the error rate below 0.9. Thresholds are a way of ensuring that your system is meeting the performance goals you set for it.
We are also defining the shape of the traffic by ramping up and down the VU (virtual users).
2) Setup test cycle
There are four distinct life cycle stages in a k6 test: “init”, “setup”, “VU” and “teardown”. Refer to the official docs for an explanation.
export function setup() {
  // The result of the set up code will be passed down to the main function
  // Called only once per test
  // Return any data if you want to be use it in the next steps
  // We start by collecting static resources paths ( Doesn't matter which user, static assets will be the same)

  const res = http.get(URL, {
    cookies: Object.assign({}, usersToken[0].cookies),
    headers: {
      "X-Requested-With": "XMLHttpRequest",
      "x-csrf-token": usersToken[0].cookies["XSRF-TOKEN"],
      "Accept": "application/json",
    }
  });

  // Extracting the paths from <link /> elements
  // Vue uses link prefetch with all the static assets
  const doc = parseHTML(res.body);
  const assets = doc.find('link');
  const staticAssetsPaths = [];

  assets.each((idx, el) => {
    const path = el.getAttribute("href");
    if (
      path.startsWith("/css") ||
      path.startsWith("/js") ||
      path.startsWith("/fonts")
    ) {
      staticAssetsPaths.push(URL + path);
    }
  });

  return staticAssetsPaths;
}

export default function (staticAssetsPaths) {
  // You can't import any files here. Use the global scope to import modules or data.
  // The below code will be run in loop for the amount of Virtual Users that we have specified.

  // Select random user
  const user = Math.floor(Math.random() * usersToken.length);
  // Getting and setting the required cookies for auth calls
  const { cookies, id } = usersToken[user];

  // This will set the cookies for all the requests
  const jar = http.cookieJar();
  Object.entries(cookies).forEach(([key, value]) => {
    jar.set(URL, key, value);
  });

  // Request headers
  const params = () => ({
    headers: {
      "X-Requested-With": "XMLHttpRequest",
      "x-csrf-token": cookies["XSRF-TOKEN"],
      "Accept": "application/json",
      "x-correlationid": generateCorrelationId(generateTestId(TEST_NAME), id) // We can easilly track and identify the requests in Kibana/NewRelic/Dynatrace for example
    }
  }); // We need to pass params on every requests

  // Simulate a session on the home page
  group("HomePage", () => {
    const requests = {
      "user/preference": {
        method: "GET",
        url: `${URL}/user/preference`,
        params: params(),
      },
      "some/endpoint": {
        method: "GET",
        url: `${URL}/some/endpoint`,
        params: params(),
      },
      "another/one": {
        method: "GET",
        url: `${URL}/another/one`,
        params: params(),
      }
    };

    // Will run requests in parallel (default: 6 at once. Similar to browser behaviour)
    const responses = http.batch(requests);

    Object.keys(requests).forEach((reqKey) => {
      check(responses[reqKey], {
        "Response status was 200": res => res.status === 200,
      });

      timeToFirstByte.add(responses[reqKey].timings.waiting, { ttfbURL: responses[reqKey].url }); // Use a custom metric
    });

    group("Static assets", function () {
      const staticAssetsResponses = http.batch(createRequestsObject(staticAssetsPaths, URL, params)); // Helper function to get the abs URL for each asset involved in the test. See full gist for details.

      Object.entries(staticAssetsResponses).forEach(([key, value]) => {
        check(value, {
          "Static response status was 200": res => res.status === 200,
        });

        timeToFirstByte.add(value.timings.waiting, { ttfbURL: value.url, type: "static-assets" });
      });
    });

  });

  // User will probably spend some time looking at the Home page
  sleep(randomIntBetween(3, 10));
};
This is the central piece of the test. We fire requests against our API endpoints that are used for rendering the home page. As you can see we include the static assets as well. We batch the requests so we can fire in parallel.
After that we collect the data.
3) Clean up
export function teardown(data) {
  // Teardown code
  // Called only once per test
  // Data will be whatever is returned in the setup function
}
4) Run the tests
- Install the CLI tool via
brew: brew install k6 - Test if installation was successful:
k6 -h - You can run the tests and see the output in your console with:
k6 run <test-name>.js
5) Run in the cloud
If you want to see the results in the Cloud Dashboard run the following commands:
k6 login cloudk6 run -o cloud <test-name>.js
6) Debug the script
Whenever you need to adjust the script or create a new one you should run only one test iteration for one user with k6 run <test-name>.js -u 1 -i 1.
Add --http-debug to get more details about the requests being sent and response received. Take a look at the official doc page for more info.
That’s it!
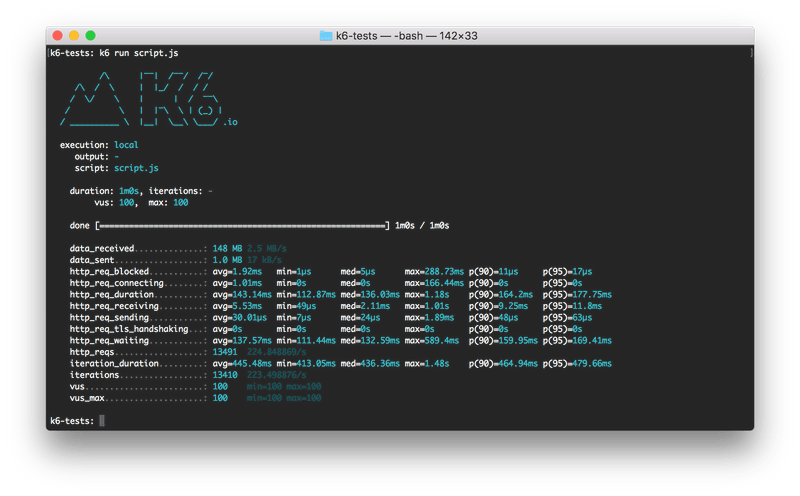
Image source
You can find the whole script in this gist.
Conclusion
There are quite a few details that I left out but can be easily found in the official docs (they are great s).
All in alls I think K6 offers great flexibility and provide an amazing dev experience. The Cloud solution extends what you can do just with the command line and it’s fairly priced.
Your scenario will probably be very different but I hope I gave you a glimpse on what is available at your disposal and how you can model traffic to test your app limits.
If you have any suggestions, questions, corrections or if you want to add anything please DM or tweet me: @zanonnicola